Stories of food, tea, pugs, simple living in big cities, and all things cute.
Thursday, April 30, 2009
Eating Well on a Budget in Seattle
The first is the Flavor of Seattle card: buy it for $50 and you automatically get $25 off a >$50 dinner at a participating restaurant. This is a great deal because it only takes two restaurant trips to pay back what you've spent on the card--everything after that is pure savings. The meal must cost $50 before tax and tip, so figuring that all in you won't leave for under $38 or so. Still a great price. Unfortunately there are only 17 participating restaurants. Some of them look really intruiging and I'd love to give them a try, but there is a potential drawback of feeling too limited by your selection.
Urban Eats (a successor, of sorts, to the New Urban Eats program) is even bigger. Forty-nine participating restaurants are offering three-course meals for $30 per person--what a deal! I clearly can't afford a $30 dinner every night, but this is a great opportunity for a nice meal without some of the worry. I recognize some of the restaurants as places I've gone or been meaning to go, but most of them are new to me. And the best part about it for me is that it's not a completely prix-fixe menu; instead there's a choice of 3-5 dishes for each course. What a godsend for those of us keeping kosher. (Really, prix-fixe menus are the bane of my existence. I don't think I've ever seen one I could eat, not even once!) The special is offered every Sunday-Thursday in May, with the exception of Mother's Day.
So... anyone want to go out to dinner with me?
Wednesday, April 29, 2009
Arugula Salad with Burnt Onions
Lunch update: I'm really excited for spring salads. There's such variety, such promise in spring veggies. There are so many possibilities as to be practically overwhelming.
Lunch today was a big arugula salad with small cubes of smokey cheddar, tangerine sections (the only domestic organic citrus I could find in Whole Foods yesterday--step it up, guys!), toasted sunflower seeds (cheaper than nuts), and the holy grail of toppings, crispy semi-burnt onions.
The onions really made the dish, but they were mostly an accident. Mark Bittman wrote about putting burnt onions over lentils and rice, so I made some to put over quinoa for dinner last night. When I had extras, they went straight into my lunch for the next day. Now I know you might be thinking that burning a salad topping is a bad idea, but you'd be so wrong. The burnt bits added a smokey bitterness that complemented the creamy cheddar well, while the caramelized center parts of each onion piece added a bit of sweetness to cut the sharp arugula. This salad was to die for.
I would have taken a picture for you, but I gobbled it all up before I thought of it!
Junk-Shop Finds
In this tough economy, buying anything to feather your nest might seem like an extravagance. But maybe you're not ready to completely give up the mood-altering delights of "retail therapy." Maybe you love the beautiful, the unexpected, or the thrill of the hunt. What to do when your budget is tanking? Consider the humble junk shop. I've found gorgeous little delights at these funky places. To wit:

I found each of these crystal decanter stoppers for just $1 each. I like to display them where they catch the sun. For me, they don't need to be whole (see the broken-off bits on the one in front?). They exist for no reason other than to be pretty.
Here's a small assortment of glass doorknobs and chandelier crystals, also purchased for $1 each. I strung many of the crystals on a small chandelier in my closet, and the rest just hang around looking pretty in a bowl. Some of my junk-shop finds are put to use. This mid-20th-century silver cigarette holder, bought for a few bucks, now holds cotton swabs and bandages in the guest room's bath.
 This bone-china teacup, also purchased for a few dollars, holds cotton squares in the same bath.
 I bought this silverplate serving tray, with its cute feet and a pierced-work "gallery" (the edge that surrounds the tray), for just $1. It now corrals salts, peppers, and such on my kitchen's island.
 I'm cheating a bit on this one. This is an egg cup I inherited from my Nana. Things that are out of fashion, like egg cups, can be picked up for cheap and used to store any number of items.
 In my bath, this pretty little sterling bowl holds samples of hand cream and a swan's down powder puff I bought for no other reason that it is the softest thing I've ever felt in my life. The silverplate child's cup caught my eye for its initials--"MJB"--a nickname my friends in college gave me. As you can see, you can keep these treasures polished, like the one at left, or let them go a bit, like the mug. Either way I think they look adorable. I think the bowl cost less than $20 and the mug a bit less than that.
 This little sterling dish might've been designed to hold nuts or candy, but now it holds a bar of delicious-smelling soap. And the crystal-and-sterling powder box, below, now holds face-washing cloths. Probably a $5 find for the bowl. The powder box was more expensive--the savvy owner knew what she had. But I loved it and haven't begrudged the $40 or so it cost.
Can you tell I like china, crystal, and silver? Occasionally I find something I like of cloth or wood, too. Like this needlepoint footstool, which cost me $1 (below). It sits at the foot of my bed and serves as a stepping-stool for the pugs when they want to jump up on my bed. (Please, don't let your dogs jump off high things like a big bed. Over the years, it can wreak havoc with their joints!)

Sit, Won Ton!
 This last piece, a china box with metal banding, I bought for $15. I was going to give it as a gift, but I fell in love with its chubby shape and silly, undersized legs. It looks a lot like my pugs to me! It sits on my dresser, where it holds safety pins and various bits of fluff.
A few words about junk shops vs. garage sales: I vastly prefer the former. Garage sales are very hit-or-miss. There are mounds of bad tee-shirts and broken bread machines to sift through, and you have to drive around to find one, which wastes gas. A junk shop, on the other hand, has many treasures all in one small space and is there every day of the week. And, if you get to know the owner, he or she is usually happy to call you if you let them know you're looking for something special. Can't say that for a garage sale!
Tuesday, April 28, 2009
Just Chillin'
Beginning a Garden
I'm not much of a gardener. I was moderately interested in planting flowers and such with my mom when I was young, but then again she's not much of a gardener either. I absolutely adored the harvest from the few summers my dad grew tomatoes and broccoli in our back yard, but I have no memories of helping him in the veggie patch. During the course of three years at my co-op in college, I probably worked in our huge garden fewer than 10 hours.
But that's not to say that I don't appreciate home gardens. In fact, I am rather in awe of a good looking patch. It's also not that I don't know how to do it--I read enough foodie blogs that I've picked up a fair amount of gardening advice on the way. I think the bigger hindrance was that I've never been in charge of a garden from start to finish. I've never decided what plants to buy and where to put them and when to harvest. This leads me to doubt myself and search out advice from even more experienced gardeners, which probably isn't such a bad thing.
For better or for worse, I was determined this year to grow a bit of my own food. I started in the fall by planing four herbs in my backyard, near the kitchen door: thyme, sage, rosemary, and mint. The garden store people said I could pretty much just put them in the ground and wait until spring to harvest, so that's what I've been doing. All four seem to have survived our freakishly snowy winter and are growing--yay! Success #1.
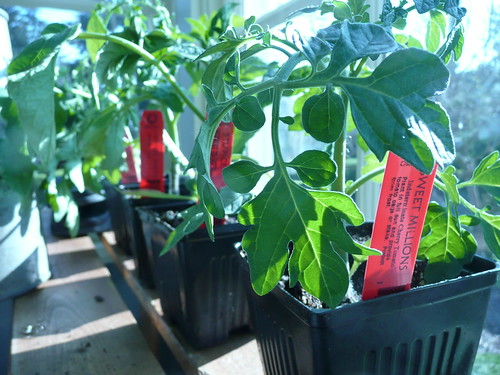
My new project is the tastiest of all home-grown veggies: the tomato. (Cue scary music in the background.) I'm moderately afraid of growing tomatoes in Seattle because I've heard so many awful stories of what can go wrong. I'm worried they'll be too cold and die, or too wet and get a fungus, or the growing season will be too short and I'll be stuck with unripe green fruit on the vine. But I found so many beautiful organic tomato starts at the Ballard farmers' market this week that I knew it was time. I picked out four varieties: early girl, Cherokee purple, stupice, and sweet millions. I've eaten the first two but never heard of the second two--seems like a good balance of old and new.
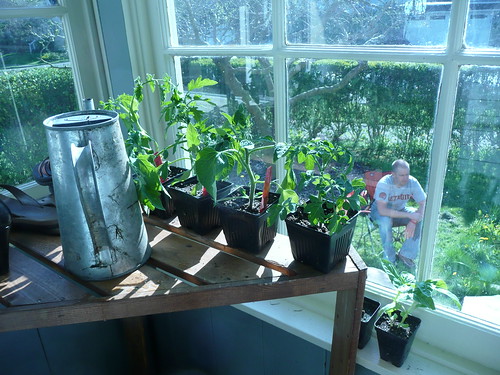
The woman at the garden stall said to grow them in a sunny window for a few more weeks and then transfer them outside in late May or early June, so that's what I'm going to do. Right now they're in the window of my mudroom, which I hope will keep warm enough at night not to freeze their little leaves. I've remembered to water them a little bit every day so far (woohoo! this is a big deal for me), so hopefully that continues. In about four weeks they'll be moved out into a 2' by 2' gardening container made from an old recycling bin and a wood lattice. Hope they can last without stakes for another month... should I be worried about this?
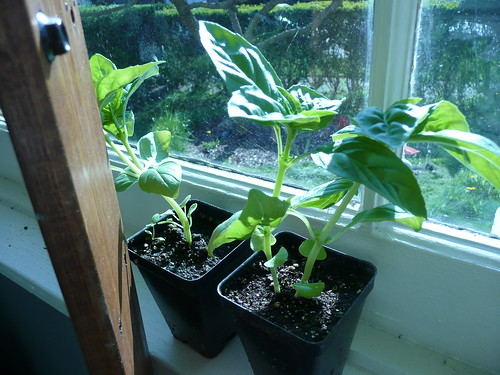
I also bought two little basil starts at the market. They might be wishful thinking, but I'm hopeful. I could eat pesto all day all summer, if only basil weren't so expensive. So here's to hoping I can grow some of my own!
I have two more containers I can plant, each a big pot about one foot tall. Any suggestions for my baby garden? Plants you really like or ones you would avoid? I'm all ears because really, I only pretend I know what I'm doing. :)
Monday, April 27, 2009
Oh No, Too Cute
Lauren Submits a Recipe!


Sweet Spider Web
Chocolate syrup
1 Tbsp. powdered sugar
1 Tbsp. peanut butter
Chow mein noodles
1 Tbsp. cocoa
Plate, small spoon, measuring spoons, straw or toothpick
On the flip side of all this page, above, is the full recipe for the Sweet Spider Web, typed by some patient schoolteacher:
1. Squeeze a small circle in the center of the plate with the chocolate sauce. Draw another circle around the first one, leaving at least 1/4 inch between the circles. Draw several more circles around the first two.
2. To make the web, place a toothpick in the center of the chocolate circles and drag the toothpick through the second and all the remaining circles, toward the outside of the plate. Continue making more spokes until it looks like a complete web. Set aside.
3. Sprinkle cocoa in a small dish and set aside.
4. Mix the peanut butter and the powdered sugar together in the bowl. Knead and mix the peanut butter and sugar together with hands, forming two balls, a large one for the spider's body and a small one for its head.
5. Gently roll the balls in the cocoa to make the spider's body look fuzzy.
6. Stick 8 chow mein noodles into the spider body to create legs.
7. Place the spider on the web and serve for a sweet dessert!

Sunday, April 26, 2009
New Website Love: Pioneer Woman
I don't think I'm in a sane place to describe exactly why I've fallen in love with every part of this website/ranch/life. I'm sure it has something to do with her beautiful photography, the stunning vistas of her land, and her cowboy-approved recipes. It also might be related to the fact that my dear friend Tara visited me in Seattle this weekend and proceeded to fall in love with every cute guy with a beard that we met. She's decided she's going to marry a mountain man and live on a farm. Part two of this dream is actually happening starting in a few months, but we're still holding auditions for Tara's loverboy.
But back to this website... seriously, go check it out. Because I'm having a somewhat jealous fit. I mean really, did you see the kitchen?
Teapots with Polka Dots

 This turquoise ensemble is cute to look at, but are the cups drink-from-able?


And finally, to go with all that tea, here's a teapot-shaped cookie iced with polka dots. Enjoy!
Saturday, April 25, 2009
Lengthwise


 Inagua Dress from Anthropologie
Wednesday, April 22, 2009
Vegetable Lasagna

The beauty of lasagna is that it is so easy to modify based on what is in season or even just what is in your refrigerator. The staples are large flat sheets of pasta, sauce, and cheese. Other than that, it's all up to you. A winter lasagna might have layers of butternut squash and onion while a summer dish might include zucchini and pesto. Play around! Be inspired by whatever looks good at the market! My spring lasagna included mushrooms, red onion, sweet potato, spinach, and lots of garlic, all held together with tomato sauce.
What really made it special, though, was the noodles. I've been experimenting with making my own pasta recently, and it's never easier or quicker than making lasagna noodles--there's no extra cutting step involved! There's something very delicate about fresh pasta that you just can't get from dry. A hand-crank pasta roller is very inexpensive, although it's a bit easier to use an automatic roller like the attachment for the Kitchen Aid stand mixer. If you don't want to go to the trouble of making your own, you can easily get fresh pasta sheets in the refrigerated section of your grocery store. I saw a pack in Whole Foods for $3. I promise they're worth it.
The following recipe is what I did to make my lasagna, although my measurements are generally estimates. This recipe is easy; don't worry too much about the specifics. Whatever fillings you choose, make sure to pre-saute your veggies before layering. It will help them cook all the way through in the oven and make them taste all that much better.
Sweet Potato Mushroom Lasagna
thinly-rolled lasagna noodles (see recipe below or buy the thinnest you can find fresh)
1 red onion
~2 C sliced mushrooms
1 sweet potato
a handful of garlic
1 jar of your favorite pasta sauce
1 big can diced tomatoes
salt and pepper
5 oz. spinach leaves
small tub ricotta, ~14oz
olive oil
Make the fillings:
Cut the red onion in half and slice it into 1/4 inch strips. Saute in a skillet over medium heat with the sliced mushrooms until onions are soft and golden. Meanwhile, peel the sweet potato and slice into very thin strips. I used a cheese grater, on the side that makes big thin slices of cheese (not the grating side). Peel and chop as much garlic as you'd like; I used about 8 cloves. When your mushrooms and onions are finished cooking, pour them out into a bowl. Add a bit of olive oil and the garlic to the pan, cook about one minute. Add the sweet potato strips and cook until the potatoes are slightly soft but keeping their shapes, nowhere near mushy.
Make the sauce:
In a large bowl, stir together the can of pasta sauce and the diced tomatoes. Season with salt and pepper to taste.
Assemble:
Spread olive oil on inside of a 9" x 13" pan. Lay down two to three noodles to cover bottom of pan. Spread a bit of the mushroom mixture, then a bit of the sweet potatoes, then a few spoonfuls of ricotta cheese, then a large handful of spinach. Pour a few ladle-fulls of sauce over everything. Don't worry if each layer doesn't cover every section of the dish; it's okay for each bite to be slightly different. The key is really thin layers. Repeat layering: pasta, fillings, cheese, spinach, sauce. I think I fit about 4-5 layers of this into my glass baking dish. Top the lasagna with a layer of pasta, a nice covering of cheese, and the last of the sauce. Bake at 350 degrees for 30-40 minutes, until the top is golden and the kitchen smells delicious.
Basic Homemade Pasta
1 1/2 C semolina flour (Bob's Red Mill brand is in most grocery stores)
1/2 tsp. salt
2 eggs
2 T water
2 T olive oil
Mix flour and salt in a large bowl. Add eggs, water, and oil and stir until mixed through. Knead briefly, cover with a damp towel, and let sit for 20 minutes. (This is to let the glutens develop and make the dough easier to roll.)
Rolling out your noodles will depend a bit on what type of pasta roller you have. Begin by flattening a ping-pong ball sized piece of dough with the palm of your hand. Set the roller to the widest setting and roll through so it forms a long wide noodle. Fold in half, rotate 90 degrees, and roll through again. Move your setting one notch thinner and repeat: fold (in half or thirds, depending on the length), rotate a 1/4 turn, roll through the roller, and move the setting one notch thinner. Stop when the pasta is very thin and translucent, but not so thin that it breaks in your hands. For me, that's at setting 7-8.
Make each noodle as you need it to layer into the lasagna, so you don't have to worry about the noodles sticking together as they sit.
Celebrate Earth Day with a Meatless Recipe
There are lots of silly and not-very-environmental ways to celebrate it (buying grass-scented perfume does NOT count for much, people!). Please, don't get distracted by the commercialism or turn cynical about phonies jumping on the green bandwagon. Just sort through all the options available to you and, starting today, try just one more thing to help the Earth.
You could start shopping with re-usable cloth bags. (Didja see my post, dated yesterday?) Or stop buying water in plastic bottles and use a stainless-steel, practically everlasting water bottle instead, like those available through Kleen Kanteen. You could switch out one more incandescent lightbulb for a long-lasting, environmentally friendly compact fluorescent bulb. Or maybe add one more meatless dinner per week to your dinner lineup. Here's a hearty meatless recipe I love, and even the meat-lovers in my family rave about it:

Moroccan Vegetable Stew
prep: 15 minutes
cook: about 25 minutes
yields: about 5-1/2 cups, or 4 main-dish servings
1 Tbsp. olive oil
1 med. onion, cut into 1/2-inch pieces
2 garlic cloves, crushed with press
1 tsp. curry powder (or more, to taste)
1 tsp. ground cumin (or more, to taste)
1 can (15 to 19 oz.) garbanzo beans, rinsed and drained
1 can (14.5 oz.) stewed tomatoes
1.75 cups vegetable broth or vegetarian chicken-flavored broth
2 large carrots, sliced into 1/2-inch pieces
1 box (10 oz.) plain couscous
1 med. zucchini (8 oz.), cut into 3/4-inch circles
1/3 C. golden raisins
2 tbsp. chopped fresh cilantro leaves
grated Parmeggiano-Reggiano, to sprinkle on top
1. In 12-inch skillet, heat oil over medium-high heat. Add onion and cook 5 minutes or until lightly browned, stirring frequently. Stir in garlic, curry powder, and cumin, and cook 30 seconds, stirring. Add beans, tomatoes, broth, and carrots; heat to boiling. Reduce heat to medium; cover skillet and cook 5 minutes.
2. Meanwhile, prepare couscous as label directs.
3. Into bean mixture in skillet, stir zucchini and raisins; cover and cook 5 minutes or until zucchini is tender, stirring occasionally.
4. To serve, fluff couscous with two forks. Divide couscous among 4 large shallow bowls. Spoon vegetable stew over couscous; sprinkle with chopped cilantro.
This recipe (which I clipped out of some magazine, I forget which) is very flexible. Instead of zucchini you can use asparagus or green beans. If you have cauliflower, you can break it into florets and add them in at the same time as the carrots. Instead of Parmeggiano-Reggiano, you can use Parmesan or goat cheese. If you don't like cilantro, try regular parsley. Or don't bother if you don't have it in the fridge.
Bon appetit!
Tuesday, April 21, 2009
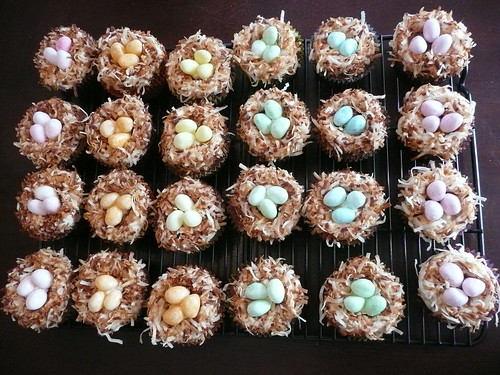
Bird's Nest Cupcakes
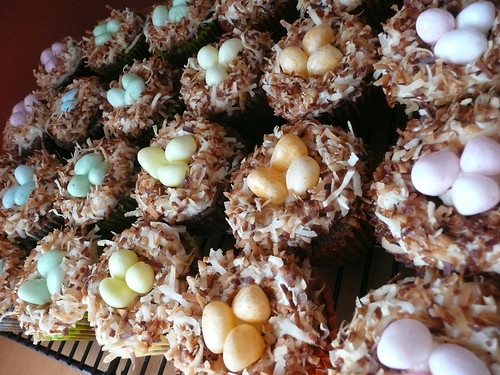
I may have gone a little overboard on the cupcake-making. I have good excuses, though, I swear! First of all, I just finished the crazy process that has been studying for/taking the MCAT. This test really beat the pants off of me, and I had put myself on a no cupcake-baking ban for the last few weeks so I could get all the studying in that I could manage. Secondly, Easter candy was on sale at Bartell Drugs. And I mean, seriously, who in the world could pass up a big bag of speckled-egg jelly beans for 99 cents? Not me, man. No way. They were just so pretty and pastely and made me feel like spring really was here, and not just in Los Angeles. (The 7o degree weather we've had the last couple days has helped too, but it's supposed to be 50 and drizzling the next few days. Ah, how I love Seattle.)

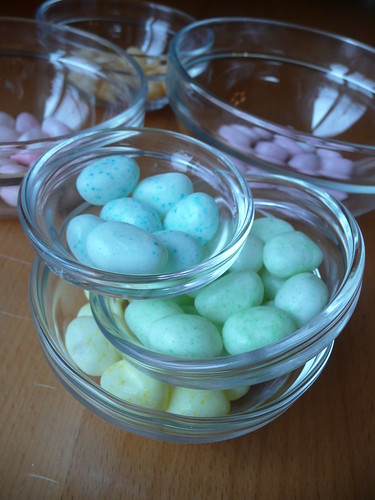
So I have this bag of egg-like jelly beans, but I want to make cupcakes that don't resemble Easter baskets. This is a bit difficult, as Easter candy is inherently designed to emulate Easter baskets. But after a bit of internet-searching, I decided to make toasted coconut bird's nests and just hope that they came across as spring-y and not Christian-y. (Although I'm not sure what "Jesus is risen" and "chocolate-covered eggs" have anything to do with each other--other than somewhat pagan origins.)
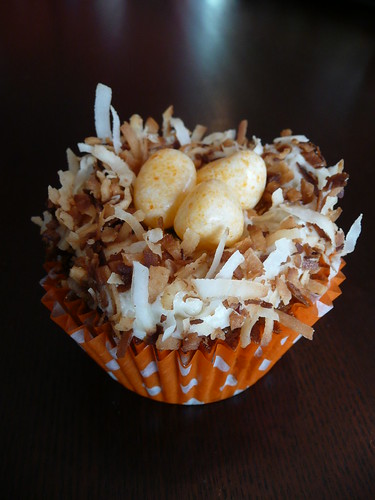
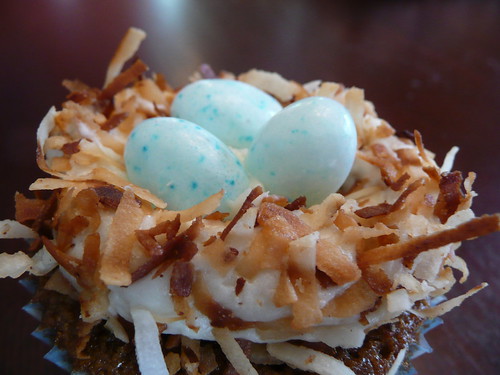
Once toasted coconut was decided as the topping flavor, I chose a tropical-feeling cake flavor as well: carrot pineapple. Turns out my mother's carrot cake recipe already called for some crushed pineapple for extra moistness, so I just changed the ratios a bit so that each flavor would balance out the other and niether would be overpowered. The end result was a very moist cake with a deliciously sweet coconut-cream cheese frosting, all topped off with three little candy eggs. Pretty cute, if I do say so myself.
Carrot-Pinapple Cupcakes
makes 24 cupcakes
1 C butter
1 C brown sugar
4 eggs, room temperature
2 C flour
1 1/2 tsp. baking soda
1 1/2 tsp. cinnamon
1 tsp. nutmeg
1/2 tsp. salt
1 1/2 C grated carrots
1 1/2 C crushed or grated pineapple, drained well
In a large bowl, cream together butter and sugar. Add eggs and beat. In a separate bowl, stir together flour, baking soda, spices, and salt. Add dry ingredients alternately with carrots and pineapple, mixing well after each addition.
Line cupcake pans with 24 cupcake papers. (I chose to match the color of my eggs to the color of each cupcake paper, so that took a bit of planning and counting of each color before I began. But these things are so cute that it's really not necessary to do this extra step.) Fill prepared cupcake papers about halfway with batter. Bake at 350 degrees for about 25 minutes, or until a toothpick comes out clean.
Coconut Cream Cheese Frosting
makes decoration for 24 cupcakes
4 oz. cream cheese, softened
1/2 C butter, softened
1 tsp. vanilla
~1/2 C finely grated coconut
~1 lb. powdered sugar
2 C sweetened coconut flakes
Cream together cream cheese and butter until homogenous and soft. Add vanilla and coconut and mix thoroughly. Beat in the powdered sugar a bit at a time until frosting is the right consistency, thick but spreadable and holds it shape.
Toast the coconut flakes in a skillet over medium-low heat. Stir often--coconut has a high fat content and will easily burn if you stop watching it. Remove from heat once all of the coconut is golden.

Assembly
Let the cupcakes cool completely. Transfer frosting to a pastry bag with no metal tip--the opening should be about 1/2 inch wide. Working a few cupcakes at a time, pipe a big O on top of the cake. Turn the cupcake over and lightly smush each O into the skillet of toasted coconut, flattening it slightly. Sprinkle coconut liberally all over the sides of the O and shake off any extra that doesn't stick. Pipe a dot of frosting in the middle of the O and decorate with 2-3 candy eggs.
Smile and enjoy!
Bag Lady


Sometimes an Earth-friendly shopping bag will just fall into your lap, like this one. My family received it recently. Instead of using wrapping paper, the giver sent us goodies in this bag--a very thoughtful gesture and a gentle reminder to be kind to our planet.


Above, these are my newest, most favored bags. I found them for sale at my upscale grocer's. Called "b.happybags," they cost a bit more than your standard-issue canvas bag, but they have miles of style! These are just two of their fabulous array of colors and patterns. I like taking these to the mall, because at about 50% larger than a grocery bag, they can handle a lot of stuff, and they don't make you look like a bag lady. From the tags attached to these bags, I quote the following:
"Americans use approximately 14 billion plastic bags each year. That's about 425 bags per person! Only 1-3% is recycled....In New York City, one less plastic bag per person annually would reduce waste by 5 million pounds!...In one year 14 million trees are cut to produce the 10 billion paper bags used by Americans."
That's unforgiveable! Let's make it a trend, people. Whether you get your cloth bags from a friend, buy them on the cheap at the supermarket, or spend a little more for some serious style, become a Bag Person!
A few tips on getting into the bag habit: If you have trouble remembering to take reusable bags with you when you shop, put your keys or wallet on top of them. If you can remember to take them out the door, store them in your car. If you find you leave them in your car as you head into the mall or grocery store, put your purse or wallet with the bags. Or stick them on your lap. Or sit on them. If you have no space for canvas bags in your life, there are itty-bitty folding-up ones of nonrippable nylon that stuff into a tiny stuff sac that you can stick in your purse or coat pocket or leave in the top drawer of your desk at work. Do it for the planet!
Thank you.
Sunday, April 19, 2009
Family Silver
 Recently my hubby's Aunt P. passed away after a very full and long life. She bequeathed to said hubby six oddly shaped little sterling silver spoons (the first six, starting from the left of the above photo). Nobody in the family knew what they were, so I took them to my very good local silversmith. It turns out they're egg spoons, created by the Victorians for the express purpose of eating one's morning soft-boiled egg out of its shell.
 Above is a closeup of the little beauties, which the silversmith says were manufactured in America between 1900 and 1910. She also told me a great deal more about sterling silver:
So, no more egg spoons that look like the chubby little brother of a teaspoon. Alas!
Luckily, some of these cuties from years gone by are still around, passed down through families or snapped up in junk shops or online silver sites. And they can still be enjoyed, in new ways. I think Aunt P.'s spoons will make great spoons for eating yogurt, or for stirring coffee, or for ladling jelly out of a jar onto a hot, buttered slice of toast. Why eat your yogurt with a sterling spoon? Well, why not! What are you waiting for?
In fact, to make sure that I enjoy the old family silver as much as possible, a couple of years back I moved it from the formal dining room, where it languished from disuse. Now it's in a drawer in my kitchen, where I'm more likely to grab it. Yup, that's it, right under the cannister set and the crockery bowl of bananas (below).

If you want to know more about American silver, there are some good books out there. I like the Encyclopedia of American Silver Manufacturers, by Rainwater and Fuller. It's available in paperback, and it has pictures of all the hallmarks (the symbols, letters, and numbers stamped on the silver) to help you identify your sterling.
P.S. Ice cream tastes absolutely fantastic off a sterling silver spoon!
